What is Hard Plumbing in a Reef Tank?
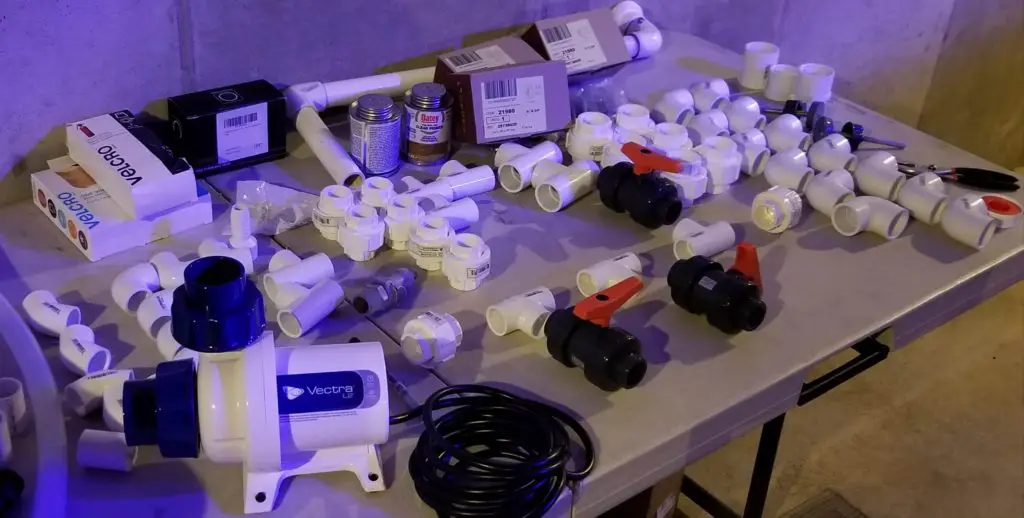
Hard plumbing in a reef tank refers to the use of hard rigid plastic or PVC pipe to connect the display tank to the reef sump. Hard plumbing involves planning your system, choosing the right PVC piping, the right fittings, measuring the runs, and connecting everything. Hard plumbing is usually done at the reef tanks overflow drain, emergency drain, and return lines.
I’ve hard plumbed my last three aquariums. After practice, the task isn’t too difficult and you can customize your plumbing system to your specific standards and meet the needs of your aquarium. Hard plumbing is my favorite way to plumb a reef tank. Hard plumbing is, in my opinion, the most secure type of plumbing, offers the most customization, and simply looks cool. Read below to find out all about hard plumbing a reef aquarium.
Advantages of Hard Plumbing a Reef Tank
A well-designed and properly installed hard plumbing set up on a reef tank has many advantages. Hard plumbing when done right will be leak-free and should last longer than the life of the tank. There are several fittings and options when plumbing with hard PVC that will allow you to fully customize your drain and return system in your reef tank.
Hard Plastic PVC Pipe
Schedule 40 versus Schedule 80 PVC Piping
The schedule or Sch abbreviated of a PVC pipe refers to the wall thickness of the PVC pipe. A lower schedule equates to a smaller pipe wall. The smaller the pipe wall the less pressure the pipe is capable of containing. In the home reef aquarium, schedule 40 and schedule 80 are the most common PVC types used. Schedule 40 white pipe and fittings can be found widely at most local home improvement stores. Schedule 80 is often found in other colors and is usually found easier online. Common schedule 80 fitting colors are grey and black. Most home aquariums are not under a lot of pressure and schedule 40 will more than suffice for most home aquariums.
Schedule 40 Pipe

Schedule 80 Pipe

Pipe Size
In addition to pipe schedule, the pipe size is also another factor in PVC hard plumbing. Pipe size refers to the inside diameter or bore of the pipe. The most common size for home aquarium plumbing is 3/4” for return lines and 1” for drain lines. These sizes can vary though as tanks get larger or smaller and other connections are made to various other pieces of equipment.
Standard PVC Fittings
Fittings are PVC attachments that perform a wide variety of tasks on the plumbing lines. Fittings just like pipes come in different schedules and sizes. In general, you will want to match fittings to the size of the pipe you are using. There are also special fittings that will allow you to change to a larger or smaller pipe or even transition to a different type of pipe, like a soft hose. There are many different types of fittings and they can be used to customize your system. Here are some of the standard fittings you will find.
- 90-degree elbow: As the name implies the 90-degree elbow allows you to turn your pipe runs in 90 degrees. These are especially helpful for turning around corners.

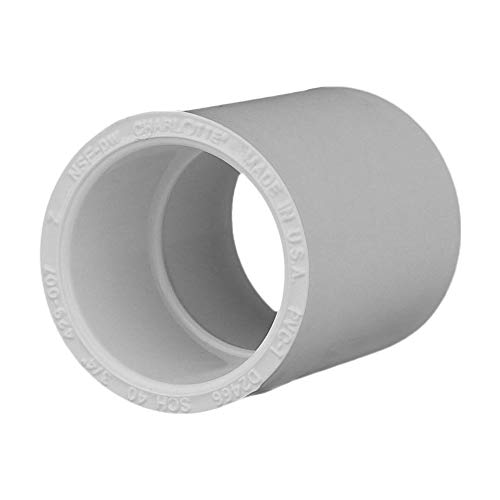
- Coupler: A coupler allows you to join two separate pieces of PVC pipe together.
- Adapters: Adapters come in various sizes and allow you to do different things. Some adapters will allow you to connect two different pipe sizes. One end will be small and the other large to transition from 3/4” to 1” as an example. Other adapters can help you change to a different kind of pipe. A barbed hose adapter will allow you to change from PVC to soft tubing hose.
Adapters

- Plugs/Caps: Plugs or caps can be used to stop a run of pipe. You may leave an end open for future use, and a cap will allow you to easily open the run back up if needed in the future. Plugs allow you to close the end of a run with a spigot or threaded fitting making it easy to open and add other fittings as needed. A cap simply goes over the end and caps off the run.

- 45-degree elbow: A 45-degree elbow will allow you to turn your PVC runs in 45 degrees. This is especially helpful for slight turns in your runs. Multiple 45-degree elbows can be used to make full 90 degree turns.

- Cross: A PVC cross will allow you to split a run into three.
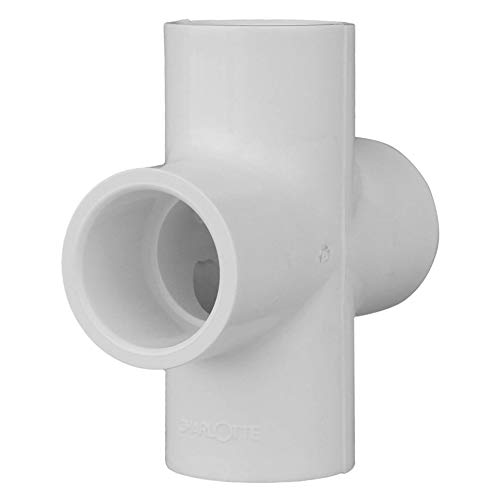
- Tee: Tees allow you to split one run into two.

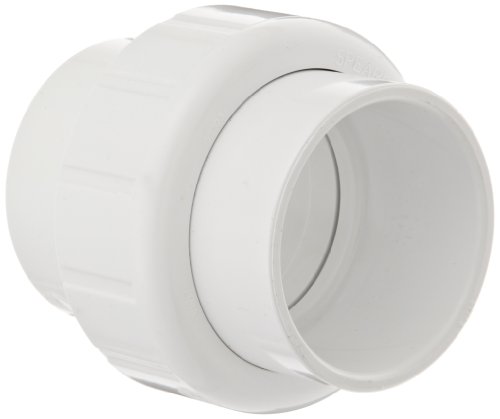
Unions
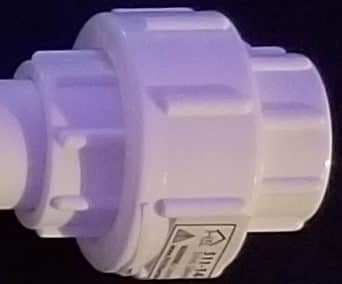
Unions are a must in reef aquarium hard plumbing. Unions allow you to easily connect and disconnect sections of PVC pipe. Without unions, your entire plumbing would be set once connected and it would require you to cut out sections when you want to modify runs. Unions work by having one side that connects to its other side by screwing it on with your hand. A rubber gasket inside the union helps make the connection leakproof. Unions should be used where ever it is possible especially in areas that might need future maintenance or might change in the future.
Valves
Valves usually work by restricting water flow through the pipe. There are few different kinds of valves and the most common valves found in reef aquariums are Gate Valves, Ball Valves, and Check Valves.
Gate Valves
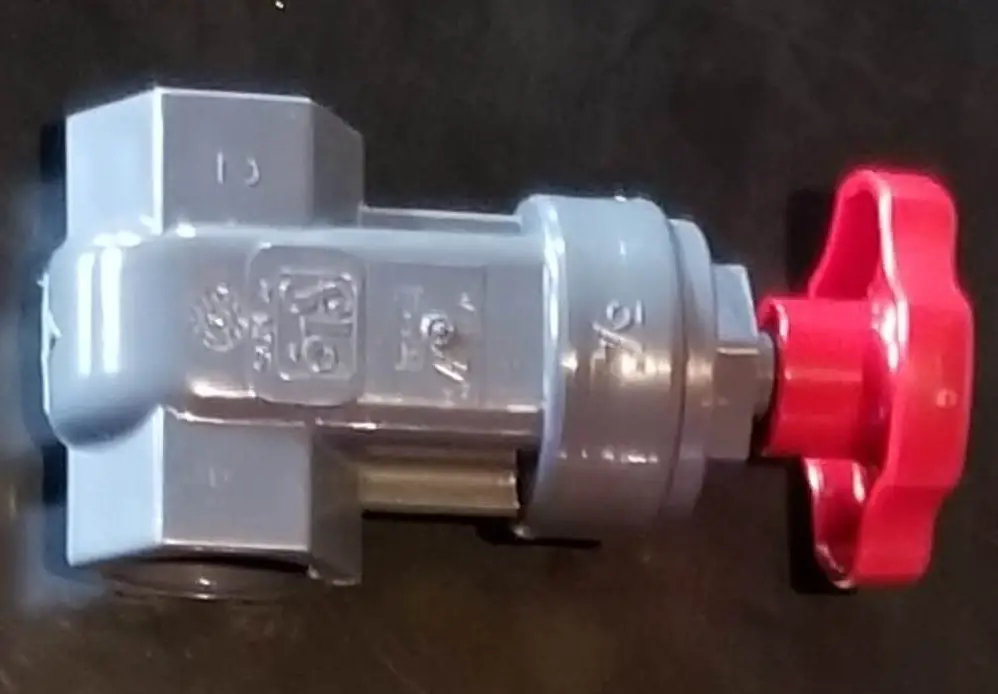
Gate valve work by manually turning a dial to lower and raise a gate inside the valve. As the gate closes, flow is restricted through that part of the line. Gate valves are generally found on drain lines and used to adjust the water level within an overflow box. Gate valves allow precise adjustments to flow. Gate valves can also be used on return lines where you close the valve to put back pressure in the lines. This can be helpful if you have a manifold after that return line and need additional pressure to run items connected to the manifold.
Spears PVC Schedule 80 Gate Valves
Gate valves, socket ends, EPDM, sizing: 3/4-inch. Schedule 80 pipes are thicker, heavier designed to handle more PSI than Schedule 40.

Ball Valves
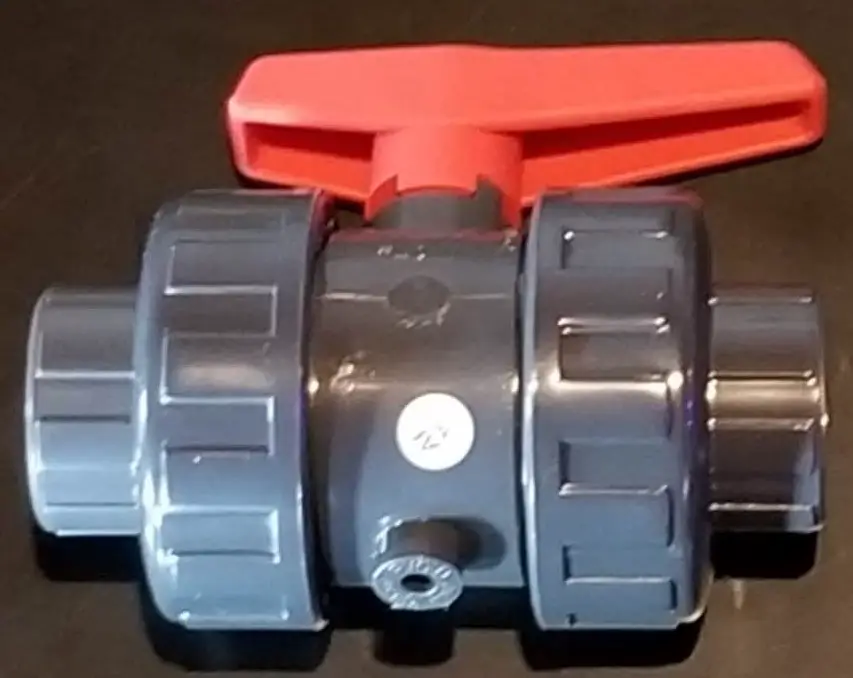
Ball valves are similar to gate valves on restricting flow through a pipe. Ball valves work by adjusting a ball inside the valve so that the flow is opened or closed. The ball has a hole in the middle of it and when closed the ball block the flow. When open, water can flow through the hole in the ball. It is much harder to control flow with a ball valve and they are better suited for all on or all off flow uses. You will typically see ball valves on manifold connections and any other areas where the flow would occasionally need to be cut off completely. I have a frag tank plumbed into my main display tank and occasionally I will take the frag tank offline. To do so, I simply close the ball valve on the return and drain the frag tank.
Spears PVC Ball Valve
Gate valves, socket ends, EPDM, sizing: 3/4-inch. Schedule 80 pipes are thicker, heavier designed to handle more PSI than Schedule 40.

Click here to see my article on when to use Gate Valves and Check Valves on a reef aquarium.
Check Valves
Check valves are typically used as a safety valve on reef tanks. There are two types of valves commonly used the flapper style check valve and the wye check valve. Flapper style check valves have a flapper that opens as water pushes it up, when the water flow comes back down it pushes the flap down closing the flow into your sump. With a wye valve, a weighted ball is pushed up a short tube off the side of the main pipe when water is flowing through the pipe. When water comes back down, the ball drops and cuts off the back drain into the sump. When an aquarium loses power water from the display tank can drain from the return lines inside the tank until air comes through the return end and breaks the siphon. If the ends of your return lines are really low in your tank and your sump can not hold the volume of water you might be in for an overflow and massive damage to your home and aquarium life. Check valves work by opening up as water flows up through the line and shuts its self automatically if water comes down the line in the event the pump stops pumping. Check valves sound like a good idea, but there can be disadvantages. A check valve might fail and they can be hard to maintain regularly. If you design your system correctly, there should be no need for a check valve.

Click here to read my article on if a check valve is necessary for a reef aquarium.
Reef Aquarium Manifold

A reef aquarium manifold is a way of setting up a return line so that the line can be split up and used to deliver water to other locations or to other reef equipment. A basic manifold involves teeing off a portion of a return line and adding a ball valve to the tee. The ball valve can be then connected to other pieces of equipment such as a media reactor. Additional tees and ball valves can be added depending on the needs of your tank. On my 210-gallon reef tank, I have a manifold with three tees and valves. One supplies a return line to my frag tank, one goes to my dual media reactor, and the third is simply closed for future use.
How to Make a Home Aquarium Manifold
Types of Connections
PVC pipe and fittings can connect in various ways, the two most common are slip and threaded connections.
Slip
A slip connection is a connection where it slips over the PVC pipe or fitting. When making a slip connection you will need to use primer and cement to ensure it is leak-free.
Threaded
Threaded ends have threads on the fittings that thread into another thread by screwing it on. There are two types of threaded fittings, male and female. Male threaded fittings have the threads on the outside while female threaded fittings have the threads on the inside. For threaded fitting connections, Teflon tape should be used to ensure leak-free connections.
Tools For Working with PVC Pipe
Tools for Cutting
Ratcheting PVC Cutter
A Ratcheting PVC cutter is usually my go-to when working with PVC on my reef aquarium. This tool has a blade and a pipe holder. As you squeeze the tool it slowly cuts into the PVC and ratchets as it continues the cut. This tool makes quick cuts of PVC. You want to make sure you line the blade straight and make some practice cuts to make sure you get straight cuts.

Hacksaw
A hacksaw is a great tool for cutting PVC. The disadvantage is that it takes longer and requires more manpower to make cuts with a hacksaw. It also can be tough to make a straight cut without a guide. You can use a miter box in conjunction with a hacksaw to make nice straight cuts. After cutting with a hacksaw you’ll want to clean up the edge of the PVC with a file to ensure a smooth leak-free connection where the cut was made. I like to use the hacksaw when cutting very small pieces off a PVC pipe. The hacksaw works well if you are dealing with large PVC that won’t fit into a tube cutter or ratcheting cutter.
Tubing Cutter
This tool works by increasing pressure around a cutting wheel while turning the tool around the PVC. This is a good tool that makes straight clean cuts. The tool works well but is a bit slower than a ratchet cutter but faster than a hack saw.

Tools for Cleaning up PVC Cuts
You’ll want to have smooth transitions between fittings and pipes. When you make cuts you’ll want to inspect the edge of the cuts to ensure no damage and clean edges. If you have burs on the edge you can simply file them clean with a file or sandpaper. There are also deburring tools out there that will clean up the edges and create a small lip that helps keep the glue fully contacted with the pipe.
Tape Measure
A tape measure is an essential tool for working with PVC. For a run to look right and not leak you’ll need to be very exact in many of the measurements. There is no worse frustration than a little too short in reaching a drain connection and having to start over. Another tip is to use a tape measure that will fit inside PVC fittings. Some tape measures are too big to fit inside and getting the right measurement inside of fittings is essential.
Vice clamp
A vice clamp can come in handy when cutting and gluing fittings. The vice clamp can securely operate as a third hand for you.
Reef Aquarium Bulkheads
Bulkheads mark the transition point from the tank to plumbing. Generally, a hole is drilled into a tank a bulkhead goes through the hole and allows for the connection to plumbing. A rubber gasket is also usually involved in bulkhead installations to prevent leaks. Bulkheads come in various sizes and have both slip and threaded connections options on both ends.

Tips on installing a Bulkheads
Bulkheads are usually installed on holes drilled in your tank. Drilling a tank is not too difficult and requires the use of diamond drill bits, water, a drill, and a steady hand. I won’t go into this process here, but it can be accomplished DIY or done by a glass shop.
Once you have holes in your tank you can install the bulkheads. Make sure that all the surfaces of the aquarium and bulkhead are clean before installation. Make sure all the edges are clean and smooth, you may need to use a small file to clean up edges. Install the gasket on the flange side of the bulkhead and not the nut side. Installing on the nut side will result in leaks. Do not use any products like silicon during install, just keep the gasket clean and dry. Do not overtighten the bulkhead. You’ll want to hand tighten the nut plus an additional 1/2 turn at most. Over tightening increases your chance of a leak and could potentially crack or shatter your tank.
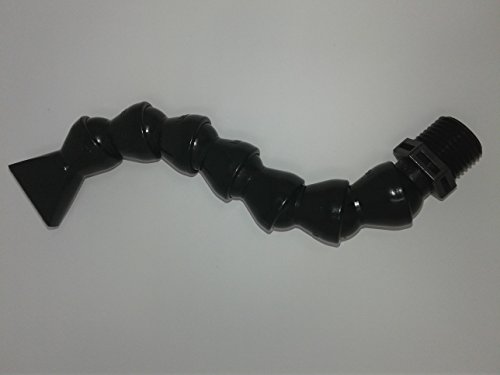
Using Loc-Line at the Return End
Loc-Line is a brand of modular hose that you will often find attached to the end of a return line at the bulkhead. Loc-Line is great because it bends and can be positioned in the aquarium in a way where the flow is directed where you want it. There are various sizes, fittings, and end adapters that you can use with Loc-Line. I typically use a male thread Loc-Line adapter screwed into the bulkhead with a segment of Loc-Line running into the tank.
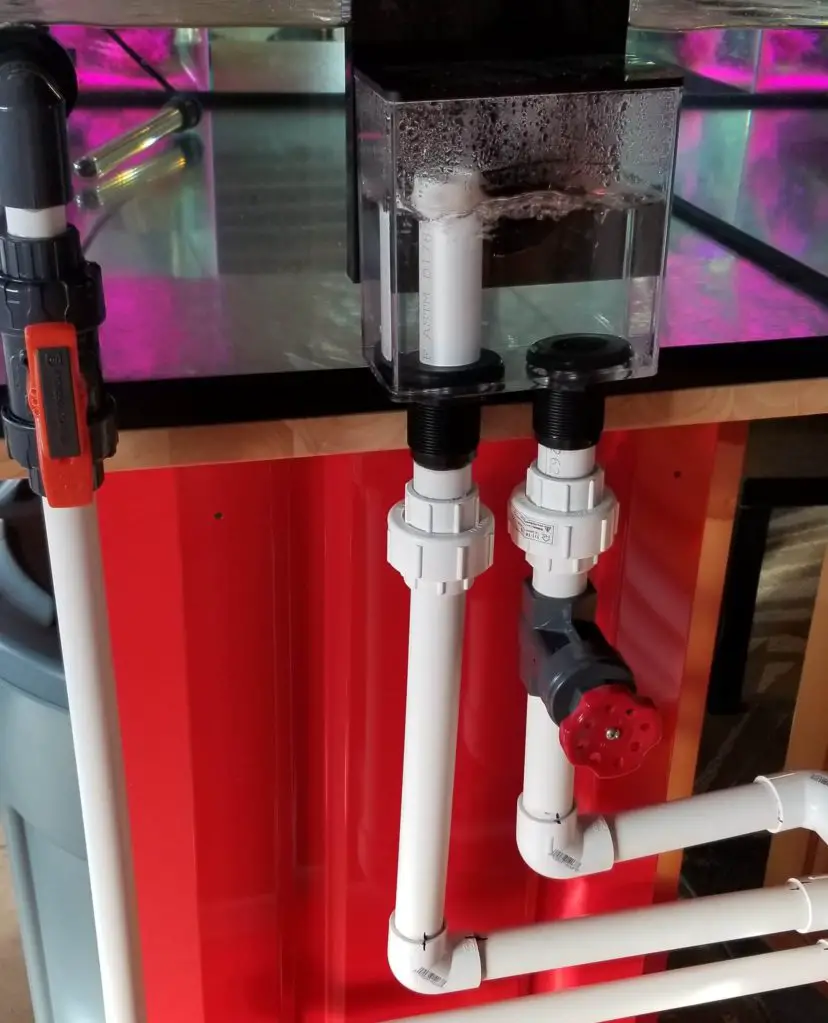
Overflow Box
An overflow box allows you to drain water from your display tank down into your sump using gravity. A typical overflow box on a drilled tank will have a box that sits inside of the tank with teeth cut out at the top of it called the weir. As the tank fills up from the return pump water goes through the teeth of the wier and flows through a hole in the tank to another box outside of the tank. Within this box is the drain or drains that will deliver the water to the sump.

Some tanks are tempered, meaning that they can not be drilled or they will shatter. There are options for hang on the back overflow boxes to add a sump to this type of tank.

Click here to read about adding a sump to a tempered aquarium.
A Basic Plumbing Set Up, using a Durso and Overflow Box
One of the most common basic plumbing setups is using an overflow box with a Durso drain line and a return line in the overflow box. With this setup, the display tank drains into the overflow box fills up to the level of the Durso drain standpipe. A Durso pipe runs up the overflow box and uses 90-degree elbows at the top to angle the drain end down into the water. A hole is usually drilled at the top of the Durso pipe to vent the pipe and prevent a siphon. The water then enters the standpipe and drains down into the sump. Once the water moves through the sump the return pump pumps water back up the return line and back into the tank.
A More Advanced Set-Up, The Herbie Method
The Herbie method typically involves two separate drains in the overflow box and separate returns. This method was coined by a fellow reefer who goes by the name of Herbie in internet forums. Having two drains in the overflow box allows one drain to act as the full siphon drain and the second as an emergency drain. With only one drain there is the possibility that it could get clogged by a snail or something else. If that happens water continues to pump into the tank via the sump and could overflow. In a Herbie setup, the water level in overflow boxes rises to a higher level where it can drain down a standpipe and down the emergency line into the sump. Another advantage with a Herbie setup is that the water level can be controlled making it a near-silent operation. The Herbie method is usually my go-to for plumbing as it is a good mix of safety, simplicity, and quiet operation.
A common Herbie setup is to have an overflow box with two drains. The first drain runs at full siphon and drains via the bulkhead into the sumps filter sock in most applications. A gate valve is attached to the full siphon line to allow you to change the level of the water in the overflow box. On the second drain, a standpipe is used in the bulkhead so that the water can be adjusted higher and almost to the top of the standpipe to limit any draining sounds inside the overflow box. This line runs anywhere into the sump. I like to plumb the emergency line above the water in the sump so that if the line is being used, I can easily hear it and check the primary line or adjust the water level in the overflow box. The return line is separate and runs into the tank where you choose. I like to drill a separate hole in the tank and connect a bulkhead and Loc-Line.
An Even More Advance Setup, The Bean Animal
I’ve not had the opportunity to utilize a Bean Animal setup, but it can be useful in both quiet operation and draining a large amount of water in a system. The Bean Animal setup is also named after another reefer’s forum name. This system uses three drains, a primary drain, a secondary drain, and an emergency standpipe. The secondary drain doesn’t act as a full siphon like the primary drain but can be utilized to drain additional amounts of water to the primary drain. A gate valve is used on the primary drain.
Primer, Glue, and Teflon Tape
Primer
Primer is used to clean and soften the PVC pipe before the cement glue is applied. Using primer ensures that a solid chemical bond is made between the two pieces of PVC being joined. I always use a primer.

Cement Glue
Cement glue is applied after primer to bond the pieces of PVC together.

Teflon Tape
Teflon tape is used primarily on threads to ensure a solid connection.

How to use Primer and Glue
- Ensure your pipe is ready for primer. Make sure both ends are clean and deburred if necessary.
- Prime your fitting and pipe. You’ll want to prime both pieces. Prime the outside of the PVC that will go into the fitting and the inside of the fitting that will receive the pipe. Use a generous amount of primer and circle around pieces until it is completely coated with primer about the length it will go into the fitting. Some PVC piping has words printed on it and I like to prime the pipe until the words are almost completely gone.
- Apply the glue to the pipe and fittings in the same manner as the primer, making sure to have a complete even coat on the pipe and fittings.
- Press the pipe into the fitting with your hand and make a small turn to line it up in the way you want the run to go. You’ll want to hold the two pieces together for about 30 seconds. When two pieces of the pipe first start to bond you will see that they tend to push out of each other, keep pressure with your hands for 30 seconds to avoid a bad connection and possible leak.
How long will I have to wait after priming and gluing?
Time will vary depending on the primer and glue you are using. The most common time that I’ve seen is that plumbing can be tested after two hours and is fully cured in 24 hours. Most reef aquariums aren’t under that much pressure and I’ve had success having tanks up and running after waiting 2 hours after plumbing and turning the tank back on.
How to use Teflon Tape
Teflon tape should be used on all threaded connections. You’ll want to wrap the tape around the threads in uniform tight revolutions around all of the threads. Make sure to wrap them in the opposite direction that the fitting will screw on. By going the opposite direction the tape will tighten as it’s screwed on.
Can You Use Just Glue for Connecting PVC Pipe?
Many people in the hobby choose not to use primer when plumbing their tanks. The fact of the matter is that primer cleans, removes impurities, and softens the PVC so that it welds together and becomes one. This is especially important when the pipes are under a high degree of pressure. In most home aquariums the level of pressure isn’t that high, but it does not resolve the need for primer. Not using a primer is another increase in the risk of a leak and a leak in your home is never good. Even a small slow drip, if not caught quickly, can wreak havoc on your floors and home. I always use primer and cement glue when bonding PVC pipes.

Is it Necessary to use Purple Primer on Aquarium PVC Plumbing?
It is not necessary to use purple primer for plumbing your reef tank. Purple primer was made to make it easier for a home inspector to ensure that plumbing in a home was done correctly with primer by making it easier to see the purple. I like to use clear primer and glue as it looks like a cleaner install. Another advantage of using purple primer is that you can see a solid line around the connection easily confirming that you have a nice solid connection.
Tips and Tricks for Successfully Plumbing your Reef Aquarium
Measure the Inside of all Your Fittings
When hard plumbing your reef tank, you’ll have to be pretty precise in your measurements to ensure that everything fits nicely together and have the best shot at a leak-free job. Measure the inside of every fitting as you are planning out your runs. I’ve found variation in length on the inside of fittings in the same type and company of fittings. The last thing you want to do is be a 1/4” short at a union fitting and have to redo sections. Find a tape measure that will fit inside of fittings.
Planning Out the Line Runs
Plan out your runs on paper before attempting to plumb. Sit in front of your tank with access to the back and front and think through where you want your lines to go and what fittings you will need. Measure as needed. Document this on paper or even consider using a computer program to sketch out a draft.
Buy Extra Pipe and Fittings
You’ll want to make sure you have the right amount of pipe and number of fittings available to get the job done. I like to purchase about 25% extra fittings and pipe length to make sure I have enough to complete the job with some room for error. You can always return the items you don’t use.
Dry Fit Everything
Dry fitting is connecting the runs without primer and glue to ensure you have the right measurements and are running the lines where you want them. Once you have a line dry fit where you want them you can mark with a sharpie a line on the pipe and fittings. These lines will make it possible to line your plumbing up the way you dry ran it. As you are gluing the pieces together just line up your marks.
Use the Same Brand of Fittings When Possible
On my 210-gallon reef aquarium, the previous owner had glued unions to the bottom of the bulkheads. These unions were several years old, and other unions that I had access to simply wouldn’t fit on these. I wanted to re-do the plumbing on the tank and found that it would be impossible unless I cut out the bulkheads which I didn’t want to do. Many fittings fit together, but I suggest using the same brand and buying extra to have on hand in case you need them.
Use a Hose Clamp Instead of a Miter Box for Straight Hacksaw Cuts
If you don’t have a miter box for cutting PVC with a hacksaw, a hose clamp can be used to get a straight cut. Secure the hose clamp to the PVC you are cutting and use it to guide the hacksaw as you cut through the PVC.
Use Soft Hose Between the Pump and Hard Plumbing
Soft silicone tubing can be used between your return pump and hard plumbing to reduce vibration and quiet your system. A hose barb at the hard plumbing and one on the pump will help you make the connection. I’ve found the best hose to use is soft silicone tubing. I haven’t found much luck finding this tubing locally, but it can be found online easily and is usually sold by the foot.
Support Your Lines as Needed
Sometimes your lines will be heavy especially if there is a manifold involved with multiple ball valves. If there is a lot of play in the lines you’ll want to secure the lines so that there isn’t a lot of pressure on connections. Metal straps found in home improvement stores work well for this. The straps are thin strips of metal with holes throughout the metal. You simply wrap the strap around the pipe and secure it with a screw to the aquarium cabinet or wall depending on where you need the support. Screwed-in zip tie mounts can also be used.

Leak Test Your Tank
Before mixing in salt or even thinking about adding rock or life give your newly plumbed tank a good leak test. Fill up your tank with fresh water and run it for a couple of days just like you would if it was in operation. Have a flashlight on hand and visually inspect every connection at the tank and in the PVC runs. Pay special attention to the bulkheads and overflow box, I found most of my leaks were there.
Leaks Can and Probably will Happen
Have lots of towels and buckets on hand in the event you do experience leaks as you leak test your work. A shop vac can also come in handy for big messes.