In the home reef aquarium, hard plumbing with PVC is king. Hard PVC plumbing can last the life of the tank with very little maintenance if installed properly. One of the problems with hard PVC plumbing can be the lack of quick changeability in a hard plumb setup. If you lack unions in your runs you’ll need to cut pipe, prime, and glue new runs to attach new equipment or lines.
Installing an aquarium manifold from the beginning of your setup or even in an existing live tank, you can open up easy options to add separate return lines, easy connections for equipment, or any other purpose that would use water from the return pump in your tank.
What is a Reef Aquarium Manifold?
A reef aquarium manifold is typically a series of valves plumbed into the return line that can be utilized to add additional return runs or to connect equipment that uses aquarium water to function such as a media reactor.
The typical setup is to have the return pump connected to PVC and the manifold installed between the pump and the main return line or lines of the aquarium.
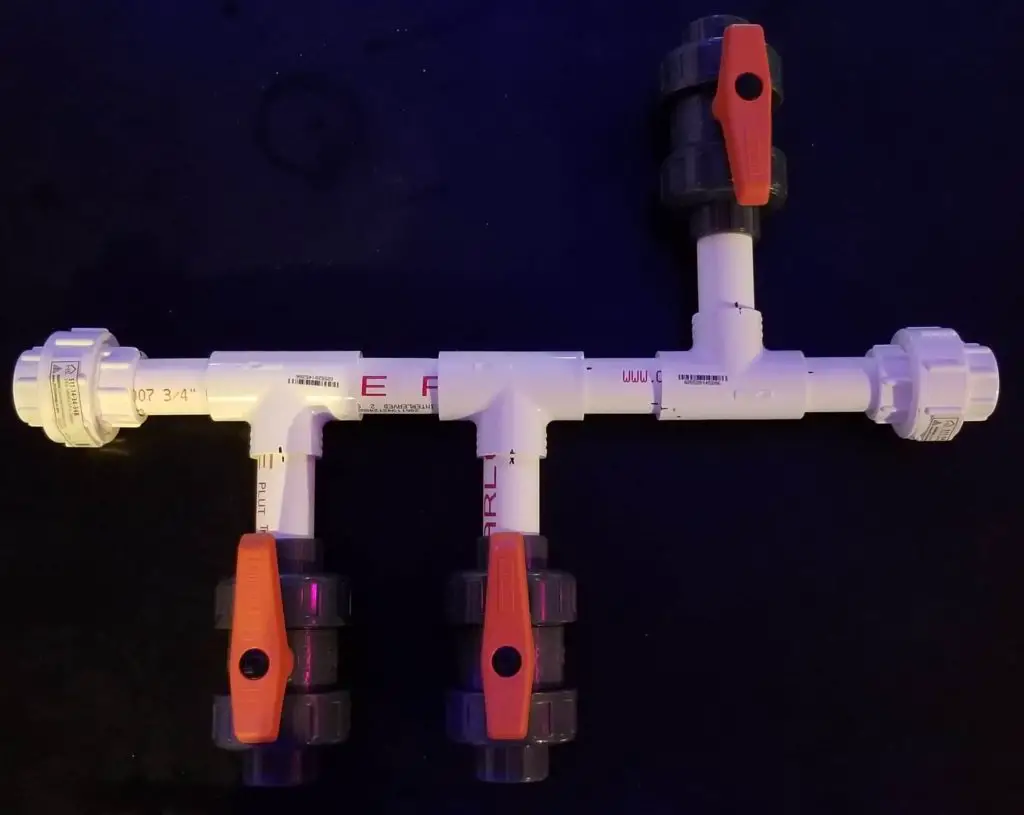
A simple manifold setup might have the return line connected to a union then into a tee, then into a ball valve, and connected to the ball valve could be anything that functions off of return water from the tank.
After the tee would be another set of tees and ball valves depending on how many ports a tank would need.
On my 210-gallon reef tank, I installed a 3 valve manifold between the tank’s two main return lines. On one ball valve, I’m running a BRS Dual Media Reactor with GFO and Carbon. The next valve is a third return line that I use to return water to my plumbed-in Low Boy frag tank. The last valve is currently open for future use.
Advantages of a Reef Aquarium Manifold
The biggest advantage of having a manifold in your plumbing is flexibility.
Having additional ports on the return line allows you to easily hook up equipment in line with your return pump.
This can be a great advantage when it comes to keeping a minimalistic approach to reefing. Before I had a manifold on my system I sent water to my media reactor with a small separate pump. This additional pump utilized additional electricity and required regular maintenance. I hooked up the media reactor to one of the valves and just like that I removed a pump out of the system and can easily service the media reactor by shutting the ball valve.
Having an extra return line can serve many beneficial purposes as well.
You can use an additional line to feed another system like a secondary tank or a frag tank. Extra lines can be used to provide flow in the sump or utilized to help with water changes as a drain.
What Equipment can be run on an Aquarium Manifold?
Anything that is plumbed and utilizes the system’s water can be plumbed into a manifold. Some equipment commonly plumbed into a manifold includes:
Media reactors – A canister filled with various media that “reacts” with water as it flows through it. Common media include carbon and GFO.
Two Little Fishies ATLPBR150 GFO PhosBan Reactor 150
The PhosBan Reactor is designed with the upflow principle to achieve the most efficient use of PhosBan or other chemical filter media. By pushing water from the bottom upward, it forces an even distribution of water through the media.
Algae Turf Scrubbers– A form of filtration that involves growing algae across a screen to help remove phosphate and nitrate.
Clear Water Scrubbers CW-100 External Algae Scrubber
An algae scrubber is a water filtering device (not to be confused with a scrubber pad used to clean glass) which uses light to grow algae; in this process, undesirable elements are removed from the water.
Chiller– Helps cool tank water to keep it in the correct temperature range in warmer climates.
JBJ Aquarium Arctica Titanium Chiller
Aquarium arctica titanium chiller; smart memory chip restores to last set temperature after power failure; digital LED temperature controller can easily be read day or night; quick installation with hose.
Chaeto Reactor- A container used to grow Chaeto in, another method to reduce nitrate and phosphate.
Tunze Macroalgae Reactor 3181
– Cultivation of algae in seawater and plants in freshwater
– Biological detoxification of ecosystems by algae / plants
– Reduction of nitrate and phosphate content
Calc Reactor- Used to deliver calcium into the tank for coral health and growth.

How to Design a Manifold for Your System
First, you want to take stock of what you’ll want to run on your manifold and if you want to have a valve open for potential use. I like to plan for N + 1 or the number of valves I plan to use right away plus one extra. Have a look at your return line and measure where you will put your manifold and if everything will fit the way you want for use and space constraints.
Items Needed for a Basic Manifold
- Extra PVC pipe (most home aquariums use 3/4” schedule 40 PVC pipe)
- PVC Primer and Glue
Oatey 30246 4 oz. PVC Regular Clear Cement and 4 oz. NSF Purple Primer Handy Pack
Achieving professional-quality results from your DIY plumbing projects just got easier with the Oatey PVC Regular Cement and Purple Primer Handy Pack.
- PVC tees: have as many tees as the number of valves you will be using
PVC Whit Tees
- Tee with three openings for connecting and branching three pipes
- Slip openings for connecting to male unthreaded pipes or fitting
- PVC for corrosion resistance, high strength, and less weight than fittings made from metal
- Valves to control water flow through each section of the manifold
- PVC unions
Spears 497 Series PVC Pipe Fitting, Union with EPDM O-Ring, Schedule 40
This Spears schedule 40 PVC union fitting has socket openings on both ends, and is suitable for connecting two pipes. The socket ends connect to pipes with a smooth bore for enhanced flow.
RIDGID Single Stroke Plastic Pipe and Tubing Cutter
Experience the durability of the RIDGID PC-1250 Single Stroke Plastic Pipe and Tubing Cutter. The scissor-style is an easy-to-use tool that’s ideal for cutting plastic tubing and pipe.
What Valves to Use
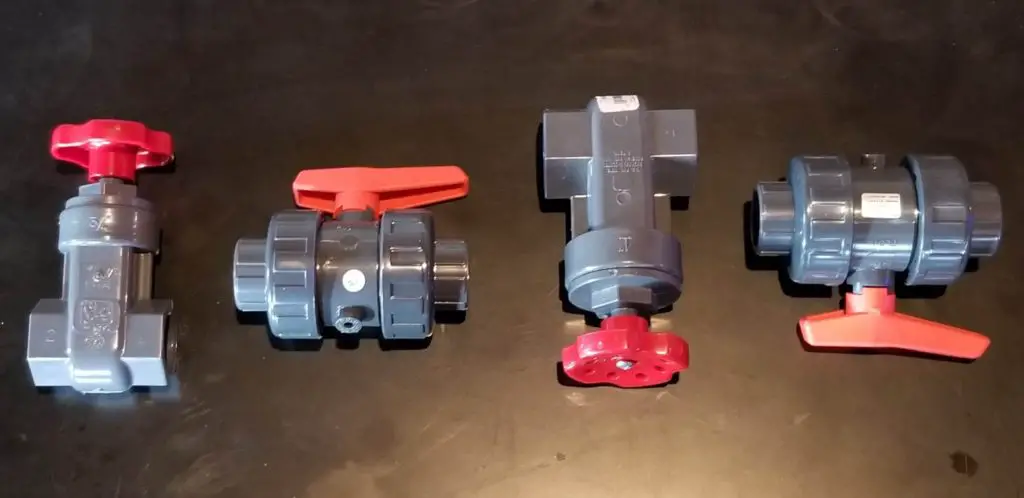
Several types of valves can be used on an aquarium manifold.
Here are some of the options and advantages/disadvantages of each:
Cheap ball valves from home improvement stores: These are tempting to use because they are readily available and significantly less expensive than other options. I would not recommend these for a saltwater aquarium though. Saltwater can be rough on plumbing and equipment over time and these types of ball valves can fall victim to saltwater. At some point, the valve could freeze making it hard if not impossible to open and close.
Homewerks PVC Ball Valve Fittings
PVC Ball Valve fitting is suitable for use as an inline valve for connecting two pipes going in the same direction and the ball valve is use a spherical disc to control the flow between pipes.
Mid-grade ball valves: These are a much better option for home reef aquariums. These are higher quality than you’ll find at improvement stores that will last longer and be easier to shut on and off over time. You can find these types of ball valves online at different websites including Amazon.
HYDROSEAL Kaplan PVC True Union Ball Valve
HYDROSEAL Kaplan Series True Union ball valve is re-engineered industrial and residential applications. Compact, and lightweight, they have a working pressure capacity of 200 PSI at 73F and can work trouble free.
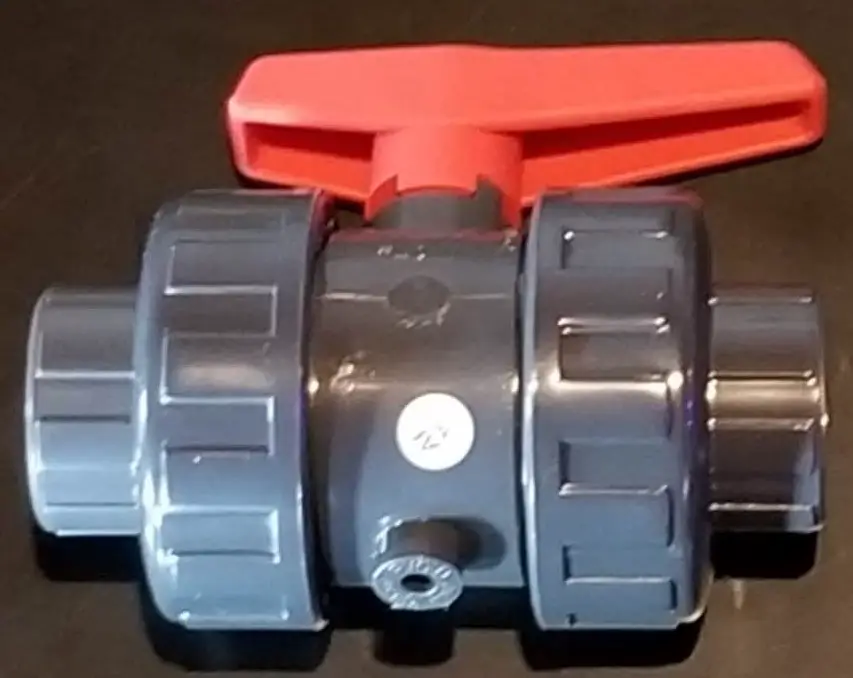
High-grade ball valves: These are the priciest of the ball valve options, but come with smooth closing and opening of the valve. These typically will come set up as true union ball valves that allow you to quickly and easily remove and replace the valve. They also typically will come with threaded and slip adapters to again make it very easy to change your setup when needed. Spears valves fall under this category.
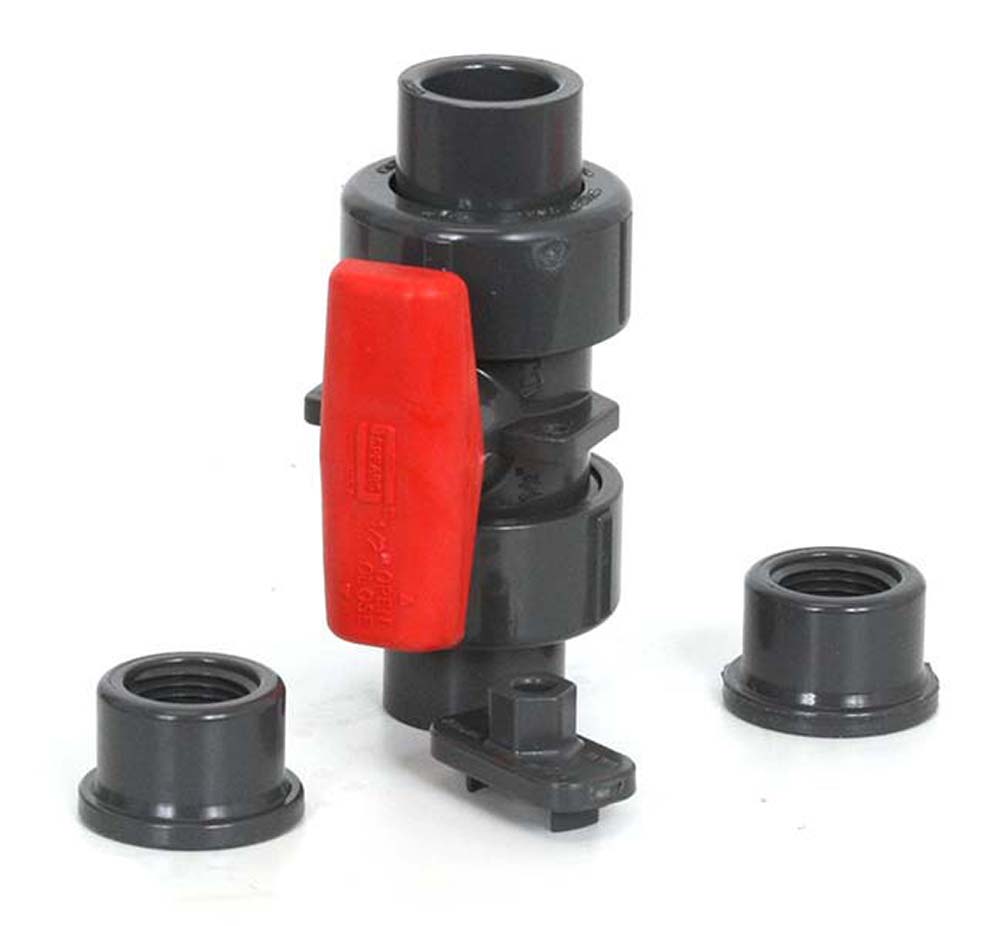
Gate Valves: Gate valves are another option that can be used instead of or in conjunction with ball valves. Gate valves allow you to better control the flow through the valve. Within the valve is a gate that opens/closes as you turn the handle making minute flow changes possible. Ball valves should be used for situations where all on or all off the flow is required. I typically won’t use gate valves on manifolds unless there is a specific flow adjustment necessary. Usually when flow adjustment is necessary the piece of equipment can manage the flow rather than needing to do it at the valve. Gate valves are usually more expensive than ball valves.
ReefSumper Recommendation: I like to have high-quality plumbing that will last, is easy to use, and has some degree of future adaptability. For that reason, I typically use a high-quality true union ball valve when plumbing my tanks.
Making the Reef Tank Manifold
Once you have the area planned out and measured where your manifold will go, it’s time to begin putting the manifold together. The first step is to cut your PVC to size based on where you want your valves to be on the return line. A simple set up from one end of the manifold to the other might look like this:
Union > PVC > Tee > PVC > Tee > PVC > Tee > PVC > Union (valves will connect off each tee)
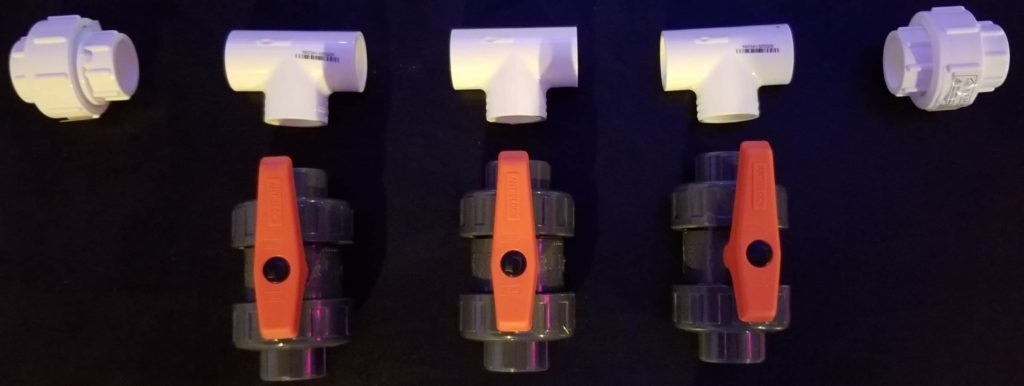
One thing to consider is the closing of your ball valves. You’ll want to make sure you have enough space between each tee so that when the valves next to each other are closed the handles don’t block each other from fully closing. Cut the appropriate lengths of all your PVC pipes and dry fit everything. Dry fitting is connecting all the components without primer and glue to see how everything looks and lines up. Once dry fitted, hold it where it will be installed on the tank to see if everything lines up where you want it. Make sure everything is good to go before gluing as you can’t go back once glued. Another step you can do is to mark where each connection should go where pieces meet, like PVC to a tee. Use a marker and mark a line on each piece so that when you glue, all you have to do is make the lines match up so that the finished product gets glued exactly how you dry-fitted it.
Once you are ready to glue everything together simply start on one side of the manifold and prime and glue each piece. Make sure to press the pieces together and hold them together for about 30 seconds after applying glue and pressing together. PVC tends to push out of each other when it is first primed and glued. Once your manifold is complete it’s usually best to wait for 24 hours for it to be fully cured, but if necessary it can be put in service 2 hours after gluing. The last step is connecting the manifold to the system and leak checking.
Plumbing the Manifold into an Operational Reef Tank
On my 210-gallon mixed reef tank, I plumbed a 50 gallon ZooMed Low Boy frag tank into the system after it was already up and established. This was a nerve-wracking project as I had to take the tank offline for an extended amount of time and cut through the return line to add the manifold. Though the process was nerve-wracking, it wasn’t too difficult and was a success.
Here is the process I took:
- I first planned out what I wanted in terms of valves and the location of the manifold.
- I measured everything multiple times.
- Ordered all the plumbing pieces including extras to make sure I could get it done in one shot.
- Built the manifold the day before including dry fitting and gluing. This allowed the manifold to cure over an extended period of time.
- I Set the tank up to potentially be offline for an extended period of time. I made sure there was flow in the tank and added an air stone to make sure the water remained oxygen-rich for the fish.
- Cut out the section of PVC on the return line.
- Glued unions on the return line and installed the manifold.
- Waited 2 hours for the new glue to cure.
- Fired the system back up and leak tested the manifold.
Attaching Equipment or Additional Return Lines to the Manifold
There are many different connections you can use to attach lines and equipment to the valves on your manifold. If you are using a true union valve with adapters for slip and threaded, you can pretty much use any standard plumbing lines, connections, and adapters to fit your needs. I have a BRS dual media reactor connected to one of the valves of my manifold. To connect it, I used a 90 degree threaded elbow connected to a push connect adapter to feed a flex line to the reactor. The push connect makes it super easy to disconnect the reactor for maintenance. Some reefers like to have additional flow in their sumps so that detritus doesn’t build up in the sump. An easy way to do this is to simply use a spigot adapter connected to a hose aimed at the area of the sump where you want the flow. You can also run extra return lines to expand the tank beyond the tank. With my 210-gallon reef tank, I have one valve pointed out at the back of the tank which supplies a hard plumbed return line to a 50-gallon low boy frag tank.
A manifold is awesome to have, as they give you additional capability as needed without the use of additional pumps. They look cool too!
