Properly installing an aquarium bulkhead is an important process in keeping your system leak-free and free from damage. Two of the most common reasons for leaks on bulks heads are placing the gasket on the wrong side and not tightening the bulkhead nut tight enough. At the same time, if you over tighten the nut you run the risk of cracking your tank.
To properly install an aquarium bulkhead place the bulkhead’s rubber gasket on the bulkhead, then place the bulkhead through the hole on the inside of the tank ensuring the gasket is on the wetside of the tank, then tighten the nut onto the bulkhead.
A properly installed aquarium bulkhead will be leak-free and last a long time without issue. Read on to learn more about aquarium bulkheads and step-by-step in-depth instructions on how to properly install an aquarium bulkhead.
What Does an Aquarium Bulkhead Do?
An aquarium bulkhead is a plumbing accessory that allows water to transition from inside the tank to plumbing. This is usually accomplished by drilling a hole in the aquarium and installing a bulkhead through the hole and attaching plumbing to the back end of the bulkhead. Bulkheads use compression to make this transition from tank to plumbing leak-free.
Where are Bulkheads Installed on Aquariums?

Bulkheads can be found in several places on the system of an aquarium. One of the most common places to find bulkheads are on the top back of a tank or the bottom of a tank. Where water drains or is returned to the tank is usually where you will find a bulkhead. Overflow boxes usually have bulkheads on the bottom of them where plumbing is connected. Another place to find a bulkhead is on a sump where the water drains from the tank into the sump. On a tank that uses an external pump in a closed-loop system, the connection where the pump connects into the sump will often have a bulkhead. Anywhere where water transitions from one container to plumbing and back will have a bulkhead.
What are the Components of an Aquarium Bulkhead?
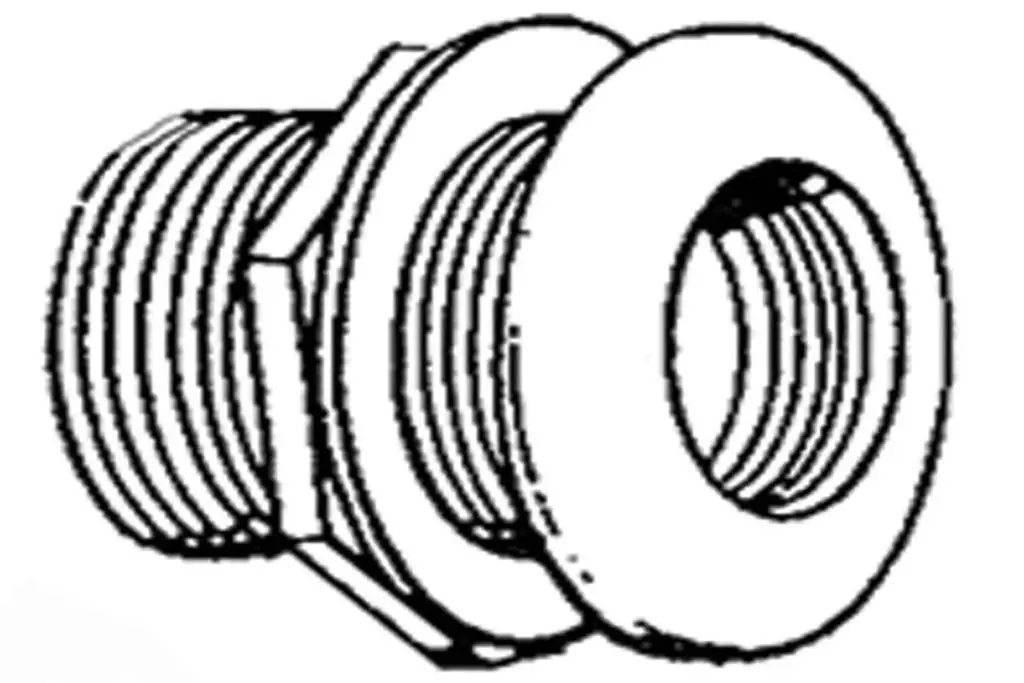
The typical bulkhead will be comprised of three pieces the bulkhead itself, a rubber gasket, and a locking nut. The bulkhead passes through the tank or sump and allows water to pass from the tank to plumbing. The rubber gasket is the essential piece that compresses the bulkhead onto the tank to allow the bulkhead to be leak-free. The locking nut goes on the outside of the tank and applies pressure to the bulkhead/gasket.
How to Install an Aquarium Bulkhead
Before installing a bulkhead make sure you have the right size of bulkhead for the hole in your tank. The listing of the bulkhead you purchase should have recommendations on the hole size and diamond drill bit if you are drilling your own tank. Once you have the right-sized bulkhead, installing it on your aquarium can be broken out into three steps: preparing the surface of the tank and bulkhead, installing the gasket, tightening the lock nut.
- Prepare the surfaces: You want to make sure that all the surfaces that the bulkhead and aquarium touch are clean. Any debris between surfaces could result in a leak. Use a rag and water or an alcohol prep pad to clean the tank on the inside and out. Then thoroughly clean the bulkhead and gasket surfaces.
- Install the gasket: The gasket should always be on the wet side of the tank. To accomplish this place the gasket on the bulkhead before putting it through the inside of the tank. Some gaskets will have a ridge on one side of the gasket that is designed to keep sand and other debris from getting in and breaking the seal. If you have this type of gasket the ridge should touch that glass and the smooth side should touch the bulkhead. Once the gasket is on the bulkhead slip the bulkhead through the inside of the tank.
- Tighten the lock nut: One the bulkhead is through the aquarium try to center the bulkhead and the gasket as much as possible. Once it is fairly centered, start threading the nut on with your hand. Tighten the nut hand tight right until you just have hand tight pressure. From there you can take a pair of channel lock pliers to make an additional 1/8 turn on the nut. Be very careful at this step. You do not want to over tighten the nut. Over tightening can cause the gasket to over compress and leak, it can also cause too much pressure on the glass and crack your tank, or you might slip with the pliers and smash them into the tank.
Leak Testing an Aquarium Bulkhead After Installation
Once the bulkhead is installed it’s time to leak test your work. Fill up your tank and turn on your return pump. If you develop a small leak at the bulkhead usually another 1/8-1/4 turn on the lock nut will resolve. Again, remember to be careful and not over-tighten. If you cannot stop the leak with slight tightening you’ll want to troubleshoot to ensure it is installed properly.
How to Fix a Leaking Aquarium Bulkhead
Related Questions
Should you use Aquarium Silicon on an aquarium bulkhead?
There are many resources on the internet that recommend using a small amount of aquarium silicon between the gasket and the glass of the aquarium. I don’t recommend using silicon on a bulkhead installation. Using silicon gives another point of failure for leaks to develop. Having a layer between the glass and the gasket could prohibit the gasket from making a flush watertight seal on the tank.
Aqueon Silicone Sealant Clear
100% silicone aquarium sealant is easy to apply to stop leaks. The high-strength silicone creates a permanent water-tight seal that will not crack or shrink. It’s formulated to be non-toxic, making it perfect for use on all aquariums.
What type of aquarium bulkheads are there?
Bulkheads are plumbing accessories and just like PVC piping, there are different schedules of bulkheads that allow different types of pressures.
The two most common schedules of bulkheads used on aquariums are schedule 80 and schedule 40 bulkheads. Schedule 40 is good enough for nearly any home aquarium, but heavy-duty schedule 80 bulkheads are available at a higher price point. Bulkheads will also come with different plumbing options just like other plumbing accessories. The two most common options are slip and threaded.

