Fragging a mushroom coral typically involves cutting the coral in half or quarters then attempting to glue or attach the frag pieces to a frag plug or a rock. If you’ve ever done this, you know that the survival rate is usually around 50% and it can be maddening to get the coral to attach to a plug or somewhere else where you want it. Gluing a mushroom straight to a frag plug or rock usually doesn’t work as the mushroom slimes rendering the glue worthless. I’ve often found that my mushrooms don’t survive frag sessions or simply disappear never to be found or show up months later somewhere where I didn’t want it growing.
To greatly improve the survivability rate of my mushroom coral frags and make it easier to mount my mushroom coral frags, I built a mushroom coral frag box and it works great. Read on to see how I built a simple mushroom box and how I utilize it.
Items Needed to Create a Mushroom Coral Frag Box
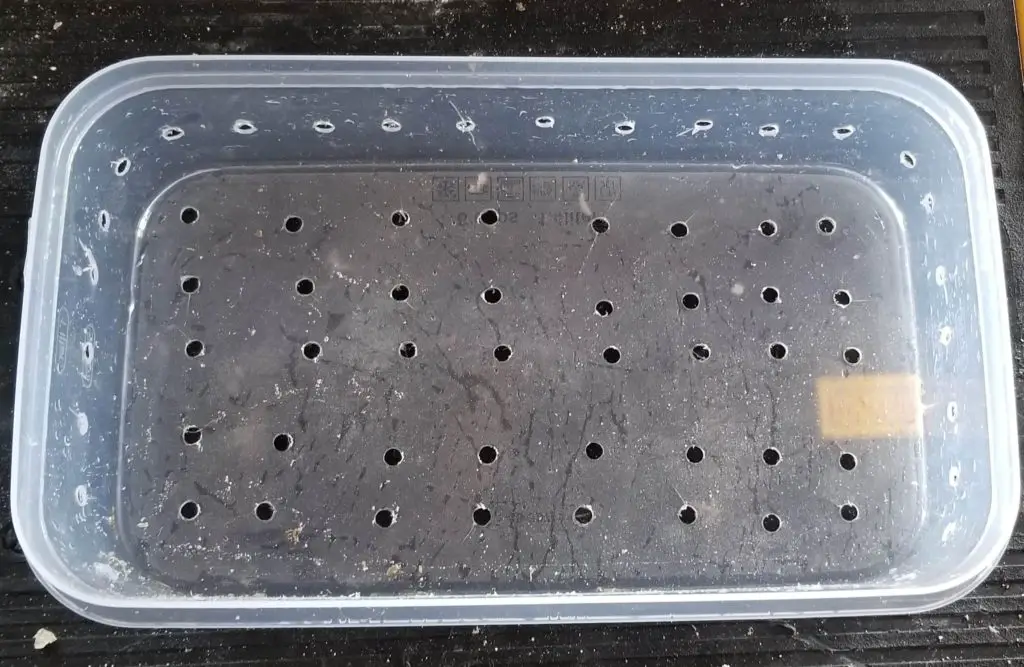
Plastic or Acrylic container: There are many different types of containers that can be used to create a coral frag box including acrylic, glass, and plastic. You’ll want to find something that has good flow through it or can be easily drilled to add flow throughout the box as needed. I like to have a container that is shallow and the right length for the place where I want to place it in my frag tank or display tank. One of the better options is to use a fish acclimation box. Many of these come with good flow holes or vents already incorporated and some even mount the sides of the aquarium giving you another mounting option in addition to just set the container on the bottom of your tank. I used a simple plastic food container I purchased at Walmart for my box. Here are some other options that would probably work well:
Drill bit: A drill bit would be used to create flow holes through your container if the container you choose doesn’t currently have them. I used a 1/4″ drill bit to make holes in my container.
Power Drill: A power drill with the drill bit makes quick work of making flow holes in your container. I used a simple battery-powered drill.
Rubble Rock: I like to use pieces of rubble rock on the bottom of my mushroom coral frag box.
I find that mushrooms quickly attach themselves to rubble rock and it makes for a quick and natural look when adding the frag to a display. Other substrates can be used, but you’ll want to use larger sand or even gravel-sized to get the mushroom coral to attach to.
Carib Sea Aquatics Quart Frag Zone
Carib Sea Aquatics Rubble Zone
Plastic Screen Netting: This is more of an optional item. If where you place your mushroom coral box there is high flow the coral may float out of the box. The netting will help catch the coral before it floats out. Usually, the mushroom will take on water, inflate, and fall back into the box when the netting catches it. You can simply cut a piece of netting and wrap it around the container to catch any floating mushroom corals. I haven’t needed to use netting on my boxes though. I found that most mushrooms do be better in lower flow medium light areas and I try to place the box in those locations where escaping mushroom corals isn’t a concern.
How to make the box
Step 1 Drill holes in the Container
Once you have your container picked out, the first step is to create flow holes in it if they aren’t already there. To do this you simply take your drill and drill bit and drill holes where you want to flow through the container. For my container, I drilled holes on every side of the container and the bottom of the container.
You want to be careful with the size of the holes on the bottom of the container. Make sure to drill a hole on the bottom that is smaller than the substrate you will be using or the substrate will escape out of the bottom.
If you are going to use sand you probably don’t even need to drill holes in the bottom of the container. I like to use rubble rock so I drilled holes in the bottom.

Step 2 Clean up the drilled holes and the box itself
After drilling the holes you’ll find that there will be a lot of plastic particles and rough edges around the holes. Take the time to clean up the rough edges using some sandpaper or a file. Next, thoroughly wash the container so that you get any plastic particles floating in your tank.
Step 3 Add Rubble Rock

Next is to add your substrate. I like to use rubble rock. I always have a piece or two of dry rock laying around and taking a hammer and chisel to it makes easy rubble rock. I put just a single layer on the bottom of the mushroom coral box. Rubble rock can also be found widely on the internet by different companies. Here are a couple of good options.
Carib Sea Aquatics Rubble Zone
Carib Sea Aquatics Quart Frag Zone
Small pieces of dry rock and dry rock rubble can be added to an established tank without issue. It’s usually a good idea to rinse the rock and get any visible organic matter off the rock before adding though.
Step 4 Add to tank
With your mushroom coral box drilled and filled with rubble rock, the next step is to simply add the box to your tank. I like to have my mushroom corals in lower flow and low to medium light.

How to Frag Mushroom Corals
There are several ways to frag mushroom corals and it depends on the situation and the mushroom that you are looking to frag. Here are some general ways to frag mushroom corals.
Unattached mushroom coral- Sometimes you may find a rouge mushroom floating around your display tank that you want to attach to a frag plug. In this case, simply capture the mushroom from your display tank and place it in the mushroom box. Within a few days, it should attach to the box’s substrate and be ready for gluing to a frag plug.
An unattached mushroom that you want to frag into multiple pieces: In this case, you will want to use a new sharp razor blade or scalpel to cut through the mushroom’s flesh cleanly.
CRAFTSMAN Utility Knife Blades, 100 Pack
In the middle of the mushroom disk is the mouth of the mushroom. To get the most chance of survival you’ll want to cut through the center of the mouth.
Use a clean single cutting motion with the razor when able, trying not to use a sawing motion. The goal is to not rip or tear the flesh of the mushroom during propagation. You can cut the mushroom into quarter pieces or in half. Another option is to use a pair of very sharp surgical scissors. I’ve found success with scissors that have thinner blades and are very sharp. After cutting your mushroom coral simply place the frags in the mushroom box and they should heal well and attach to the rubble in a couple of weeks.
Stainless Steel Scissors Medical Surgical Operating Dissecting Straight Scissors
Mushroom coral attached to live rock: For this, you’ll want to consider the best approach for what you are trying to do. If you want to preserve the rock you can attempt to scrape the mushroom off the rock using a razor blade or scalpel. This can be risky as you risk tearing the coral’s flesh and damaging the foot of the mushroom where it attaches to the rock.
If you are ok with breaking up the rock, you can use a chisel and hammer to make smaller pieces of rock around the mushroom coral you want to frag. Once you have a small piece of rock with the mushroom you can cut the mushroom with a razor blade while it is attached to the rock. After cutting the Mushroom you can use a pair of bone cutters to cut the rock preserving a piece of the mushroom on each piece of rock.
Add the Mushroom Coral Frags to the Box

After fragging your mushroom corals or if you find a floater in your display tank you can simply add it to your mushroom coral box. If needed you can temporarily cover the box with some plastic bird netting to help keep the coral in the box if it is trying to float away.
After a few weeks in the box, your mushroom coral frag should be nicely healed, attached to a rubble rock piece, and ready for mounting in your display tank or mounted to a frag plug.
