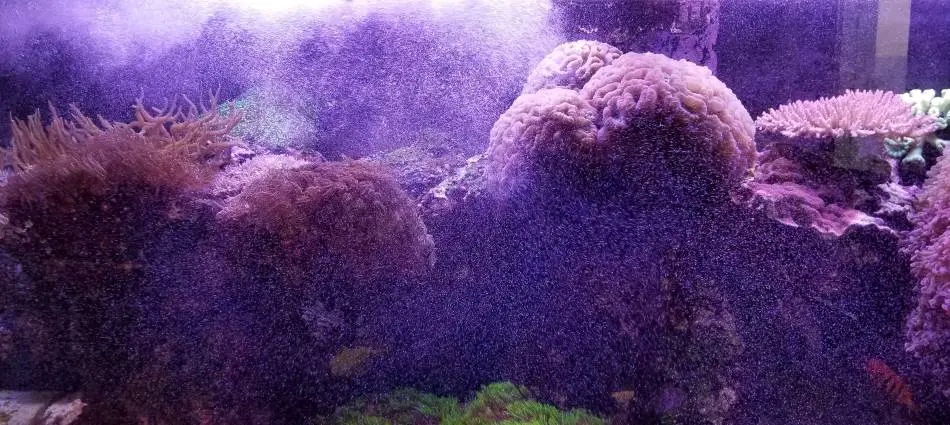
Microbubbles are tiny pockets of air in the form of a bubble that can make their way into your display tank from your sump and other equipment in the tank. These can be very unsightly giving a cloudy look to the water in your display tank. There is also a difference in opinion on the subject but constant micro bubble contact with fish and coral can be potentially dangerous for your livestock.
How do you keep micro bubbles out of your display tank? To rid your aquarium of microbubbles, it’s best to use a process of elimination to identify the root cause of the microbubbles then design and implement specific countermeasures to keep micro bubbles out of your display tank.
In this article, I will go over some of the root causes for microbubble production in an aquarium and some of the countermeasures you can take to stop microbubbles from entering your display tank.
Using a Process of Elimination to Identify the Source of Micro Bubbles
The first step you want to take is to identify the source of the microbubbles. Most of the time micro bubble creation is happening somewhere in the sump, drain line, or return line. Microbubbles are created when air is mixed in with the system’s water at some point in its flow from the tank, to the sump, and back to the tank. This mixture can happen when pumps churn water and air together when water drains from the tank into the sump, or in equipment like the skimmer that is actually mixing air and water as part of its skimming function. The first step you should take is to visually inspect your display tank, lines, each sump chamber, and each piece of equipment in the system.
A visual inspection may be all you need to pinpoint the source of excessive microbubble production. You may be able to easily see the source of the microbubbles through visual inspection. Start with the display tank and check your powerheads or any other equipment in or attached to the tank. If you find micro bubbles coming from a powerhead, chances are that the powerhead has a portion of it that may be above the water line mixing air and water. If the powerhead is above the tank water line, simply move it below and the microbubbles will resolve. If the only source of the microbubbles found is in the return line or lines next move to a visual inspection of the sump.
If your tank has been up and running without microbubble issues and randomly starts having an issue, the sump water level is often the culprit. One of your initial checks should be the water level of your sump. Is the sump’s water level at its optimal level? If there is not enough water in the sump the return pump could suck in air and water returning the mixture in the form of microbubbles into the tank. This can be resolved by simply returning the water level to its optimal level by adding fresh water to the system or adjusting gate valves on the lines. When this issue is observed you will also want to look into why the water level dropped. Check your to ensure your automatic top off is functioning correctly.
Next, move to the drain line and visually inspect the endpoint where the display tank water drains into the sump. If the point where the water drops into the sump is too splashy, it can create a lot of microbubbles that can make their way through the sump and back into the display.
Next, visually inspect the skimmer chamber and skimmer. Skimmers work by mixing air and water to create thousands of microbubbles that attract and remove organic waste from the water column. The skimmer can be the source of the problem when microbubbles exit the skimmer and make their way back up to the display tank.
Another source of microbubble production can be the return pump. Return pumps can develop cavitations which can happen when the pump impeller is turning so fast that it is exceeding the flow through the pump. Bubbles are created when this continues and low pressure builds around the impeller eventually bursting bubbles into the display tank. Cavitations can be caused by a few factors including that the pump is at the end of its life cycle or is damaged. Disassemble the pump and pay close attention to the impeller. Often just the impeller can be replaced if it is damaged saving the cost of a full return pump replacement.
The last thing to check is the return line itself. If there is a hole or leak in the return line a Venturi effect can happen. This is when air is sucked into the hole instead of water leaking out of the hole. The air then mixes with water and sends microbubbles into the display tank Visually inspect the line for any holes or leaks. You may need to tighten connections or glue any connections in the line. If all else fails and you are sure there is a leak in the return line, re-plumbing the line could be a solution.
Preventing Micro Bubbles at the Overflow
If you’ve identified the source of microbubbles coming from the overflow, there are a few countermeasures you can try to reduce the formation of the bubbles. If you’re are not using a filter sock and want to add a filter sock for filtration, it can double as a microbubble solution as well. Depending on your sump setup, you can mount a filter sock around the overflow pipe. There are retrofit sock holders that can be added when there is room at the overflow pipe exit. The filter sock will help dampen the water impact and trap the bubbles in the sock until they dissipate.
![12 Pack - 4 Inch Ring Filter Socks 200 Micron - Aquarium Felt Filter Bags -4 Inch Ring By 9.5 Inch Long [Short Version] - Fits Eshopps and Aqueon](https://m.media-amazon.com/images/I/41ZGAwgKONL._SL500_.jpg)
If your sump setup does not allow for the install of a sock at the overflow exit or if you do not want to use a filter sock another option to try is to install an elbow or elbows at the overflow exit pipe. You’ll want to point the pipe up towards the waterline of the sump. In this type of setup, microbubbles are forced up towards the waterline and have a better chance of dissipating when they reach the surface.
Preventing Micro Bubbles at the Protein Skimmer
Microbubble creation is actually a function of a protein skimmer. Excessive micro bubble discharge can happen when air and water are forced out of the skimmer. Sometimes this is a normal phase, especially with a new skimmer. Skimmers usually need to go through an initial break-in period where skimmate collection begins and the skimmer develops its organic coating on the inside of the cone. During this break-in period, excess microbubbles may exit the skimmer. During this phase ensure that the skimmer is at its recommended water level and make adjustments to the air intake to dial in the skimmer. Once fully broken in, microbubbles from a new or newly cleaned skimmer usually resolves themselves. If you disassemble and fully clean your protein skimmer it may need to go through this break-in process again. Wait a couple of days to see if microbubbles reduce as your protein skimmer breaks in.
How to Break in a Protein Skimmer
Your skimmer may act like it has not been broken when changes to the water chemistry happen which could also lead to microbubbles. This can happen when using epoxy in the aquarium to mount coral or when adding a brand new filter sock to the sump. Your skimmer is reacting to new stuff in the water column and will need time to remove the foreign matter in the tank. This issue usually resolves itself after a short period of time doesn’t typically require additional countermeasures.
If your protein skimmer is still putting out excessive microbubbles you can try positioning the skimmer so that the microbubbles have a better chance to dissipate before moving through the rest of the sump. You can try positioning the skimmer so that the skimmer’s water exit goes into a sump wall. When the microbubble hits the sump wall it should force some of the bubbles up to the sump water line where they may dissipate before moving into the chamber. Some skimmers allow you to plumb additional PVC pipe to it. If this is possible you plump the exit line using an elbow to direct skimmer discharge to the surface of the waterline. Another option at the skimmer exit is to add some filter floss to trap and dissipate microbubbles as they exit the skimmer.

Using and Improving Baffle Bubble Traps
The next countermeasure is the transition from the skimmer section to the sump’s next chamber. Many sumps have a series of baffles. The typical baffle setup is to force water flow through each baffle in a U shape with a low baffle, a high baffle, and then another low baffle. With baffles, flow is slowed and bubbles are forced to the top of the water line which again will help dissipate microbubbles before they get back into the display tank. If you do not have baffles and are experiencing microbubbles from the skimmer consider adding baffles to the sump. This can be accomplished by replacing your sump with a baffled sump or retrofitting baffles into your sump. Retrofitting baffles involves measuring, cutting glass or acrylic, and silicon into the sump. If you have existing baffles you can also improve the baffle bubble trap by adding can filter media or sponge filters between the baffles to trap and dissipate microbubbles. You can use a mesh bag filled with the media of your choice and place it between the baffle walls to catch microbubbles. To use a sponge filter measure the space between your baffles and cut the sponge filter to size placing the sponge between the walls.

Microbubbles can be a pain to deal with, but if you can identify the source there are a lot of solutions that you can try to banish them from the display tank.
Related Questions
What is a Venturi effect? The Venturi effect is named after Italian physicist Giovanni Battista Venturi (1746-1822). The Venturi effect happens when the flow is constricted by a narrowing of a pipe resulting in a drop in water pressure. A Venturi set up in an aquarium is typically used to suck air into the aquarium’s lines to resulting in aeration as it mixes with water.
What is micro bubble scrubbing in the reef tank? Microbubble scrubbing in the reef tank is the purposeful injection of microbubbles into the tank to help clean the tank. This is can be achieved by utilizing a powerhead and an airline connected to a bubble stone. Air bubbles are injected into the tank with the thought that the bubbles will go throughout the tank attaching to organic waste, raising it to the surface which is then removed from the tank via filtration in the sump. Debate continues in the hobby as to if this is actually helpful or not.